
I’ve wanted to get some fabric labels made for a while now … but of course I’ve run out of time. So I did a bit of experimenting today and whipped some up and you can too.

What you’ll need:
- Computer/inkjet printer
- Freezer paper (it’s the paper that is waxed on one side only) Reynolds Aluminum 391 Reynolds Freezer Paper
- Light weight and light colored cotton
- Baking Tray
- Vinegar
- Water
- Iron and ironing board
- 2 Scissors (paper and fabric)
First let’s talk about your logo/name design. I used Photoshop to put together my label but I’m sure you can do this in Word too.

5 Things to Remember.
- Keep it simple.
- Use dark ink (white in a logo will be left blank, showing the color of your fabric).
- Choose a font that’s easy to read.
- Keep a spacing of an inch or more between them.
- Test print a few times on regular plain paper before you go to the trouble of making a label and not liking the look or size of it afterwards!
Now for the fun part!
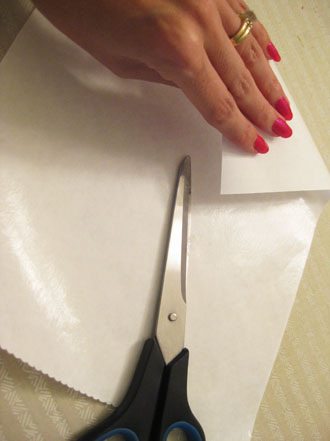
Cut a piece of freezer paper 8.5 x 11 inches (A4). Place it wax side down (that’s the shiny side!), onto your fabric. With your iron preheated to a medium to high heat, iron the plain paper backing side. You’ll start to see it adhere to the fabric. If any air bubbles appear keep ironing that spot, it’s just where the wax and fabric haven’t attached yet.
Now trim the fabric to the same size at the wax paper. Make sure you remove ALL the loose ends…..(I learnt the hard way, it causes smudges!!!)
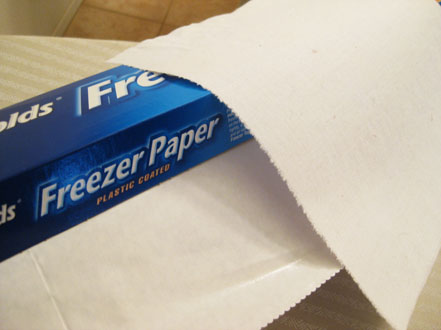
Off to the printer you skip with your new crazy fabric paper clutched firmly in your hand ….. tra-la-la …..
Press print and cross your fingers!!!!!
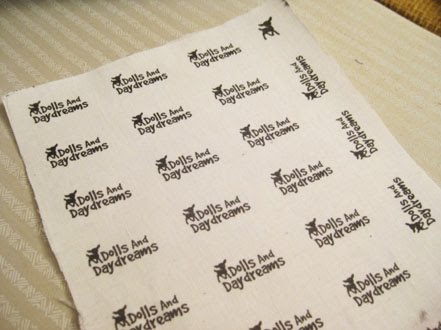
Ta-da! Stand back and be amazed … I mean look how pretty they are!!!!!
Ok the funs not over yet as printer ink is NOT color fast ……...so ……..
Wait for the ink to dry (yup this is like watching paint dry … what a bore when you're soooo excited to see your fabulous name on FABRIC!!!)
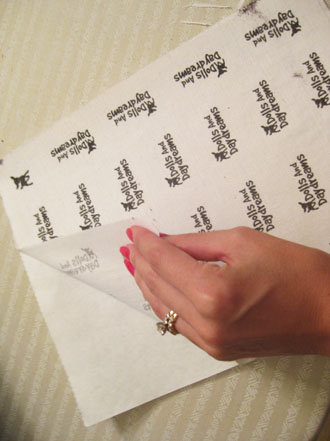
Once dry, peel away your paper backing and gawk in awe at your creation! (Seriously you feel like a fabric designer or something!!!)
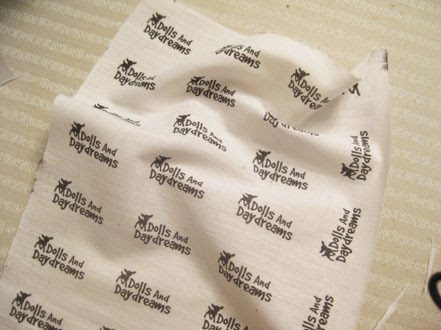
Now …. Make a little bath of white vinegar. I used a baking pan but another pot etc will do…..

Soak for 5 mins or so …. (The smell made me crave good old fashion English fish and chip … hmmm sooo hungry!)
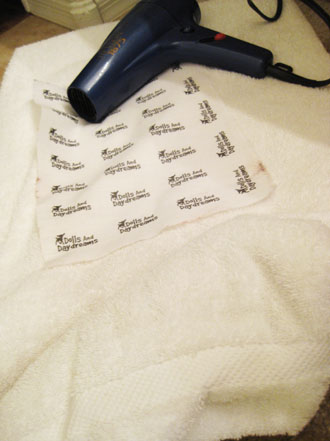
Remove from bath and gently rinse under water to get the vinegar smell out …. Then hang to dry in the sun (or if you’re impatient like me, lay it on an old towel and use a hair dryer – high heat setting baby!! Made a big batch ……. Well if you choose to use your dryer – I haven’t yet - don’t put it in with a load … just in case … ….!!!!)
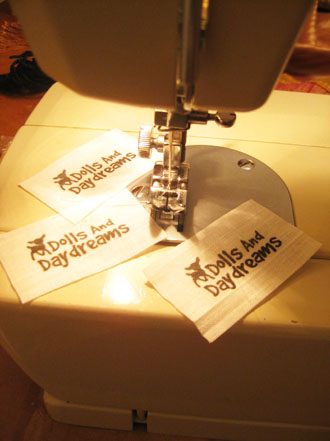
Cut and sew onto the back of your creation!
Worried about fraying edges, well if you don’t like them as a design element add some iron on interfacing and then sew around the edge using a tight zig-zag stitch ….
(If you cut your fabric on the bias before you iron on the freezer paper this will prevents fraying.)

You can also use pinking shears :)

You can also use pinking shears :)
Ahhhh the joys of creating and saving cash-o-la at the same time!
Enjoy!
Enjoy!
So the big question….. Why did I try vinegar to set the ink? Well I remembered a while ago I was trying to get an ink stain out of a lovely dress, did a search and ended up on some random site that said 'Don’t soak in vinegar!'…… and I thought hmmmm interesting! (I never did save the dress!)
Why use this method over others?
1) It’s cheap!
2) It’s much more environmentally friendly than some shiny plastic transfer …
3) It looks fab .. and works wonderfully.
……. Don’t believe me, try it, you’ll be amazed! I’ve washed, dried and rewashed labels (scrubbed them with a tooth brush and soap too!!) and there was no visible difference!!!!! Hooray! (I do recommend you test it out before you jump into a big project as all printer inks are different.)
Experiment!! Try colored photos (see below for update), poems for scrapbooking, sew them into pillows, quilts, the sky’s the limit ….. you might just find your new crafting obsession ;) I know I have!!!

**** UPDATE ****
Thanks to everyone testing this method ................. this is what we have learnt so far!
Heat Set
Those of you not heat setting your printed fabric after soaking in vinegar are seeing fading of black ink when vigorously washed in hot water and soap. So don’t forget to HEAT SET - use an iron, or like me a hairdryer on high heat or you can give your dryer a go!
Colored Printing
I haven’t tried color yet …. Just wasn’t what I was after … however … I’ve heard from 3 people all who had difficulty with ‘some’ colors. Lighter colors such as pink are disappearing in the vinegar … I have no idea if that is the printer ink they are using or this is a normal reaction.
Everyone that has tested the method so far has said that the black ink stays wonderfully! Hooray!
Everyone that has tested the method so far has said that the black ink stays wonderfully! Hooray!
Bleeding of black ink in Vinegar
This seems to occur if you have smudged the ink or you didn’t wait for the ink to completely dry before you popped it in the vinegar (I know I know … you were just too darn excited!!! But wait, it HAS to be dry!!)
